Adding plants to your home is one of the easiest ways to elevate your space, and nothing showcases greenery better than a beautiful planter. While ceramic and store-bought planters look nice, there’s something truly special about creating your own DIY cement planter at home. It gives you the freedom to design planters in any shape, size, or style you want — all while keeping the cost surprisingly low.
In this guide, we’ll walk you through exactly how to make cement planters with a detailed step-by-step tutorial, creative ideas, and pro tips. Whether you want a small pot for succulents or a large outdoor planter for your balcony garden, this guide will help you get started with confidence.
Why Cement Planters Are the Perfect Choice
Before jumping into the steps, let’s look at why cement planters are such a favorite among home decorators:
- Durable and weather-resistant: They can withstand rain, sunlight, and temperature changes better than plastic or ceramic.
- Customizable shapes and sizes: Use household containers, boxes, or bottles as molds to create unique designs.
- Minimalist modern style: Their natural grey tone adds a sleek, industrial charm that complements both modern apartments and rustic outdoor spaces.
- Affordable: A single bag of cement can make multiple planters, costing less than one store-bought pot.
- Eco-friendly: Repurposing old cartons, jars, and containers as molds helps reduce waste.
👉 Long-tail keyword fit: “DIY cement planter for balcony garden,” “how to make cement pots for indoor plants,” “cheap cement planter ideas.”
Materials You’ll Need
To start making your own cement planter, you don’t need expensive tools. Here’s a simple checklist:
- Cement (regular Portland cement works best)
- Sand (improves strength and structure)
- Water
- Two containers: one larger (for outer mold) and one smaller (for inner mold)
- Cooking spray or petroleum jelly (to release mold)
- Mixing bowl and stick/spoon
- Protective gloves
- Masking tape (optional, for neat edges)
- Paint or waterproof sealant (optional finishing)
💡 Tip: Plastic bottles, milk cartons, or old Tupperware can double as molds.
Step-by-Step Guide: How to Make a DIY Cement Planter
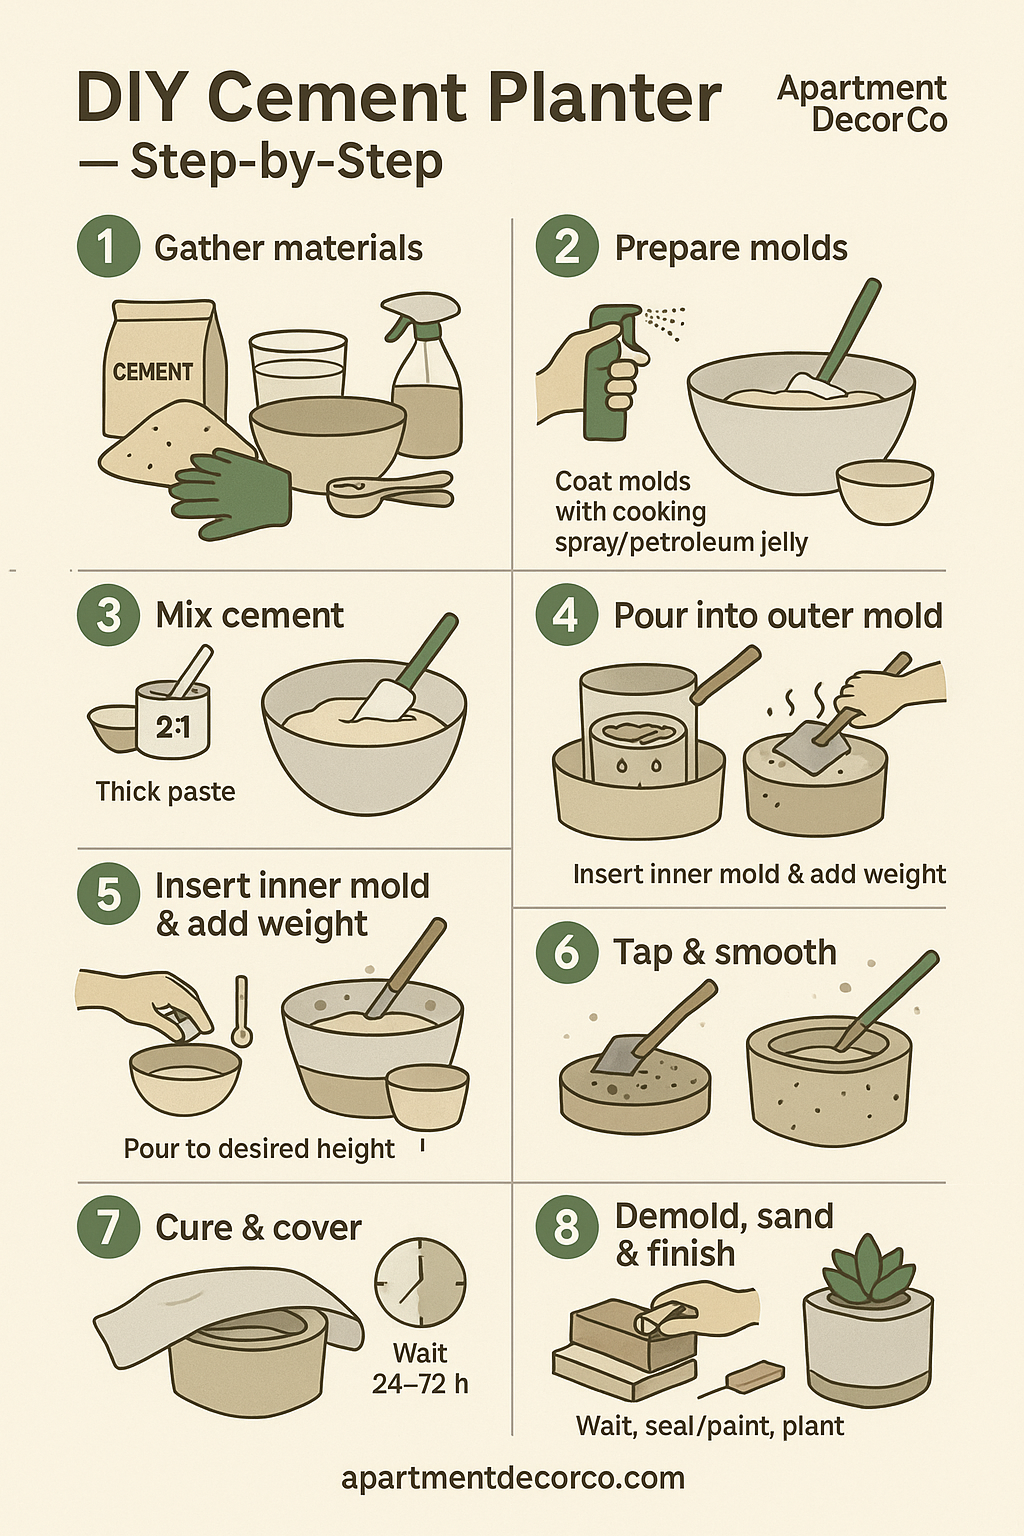
Step 1: Prepare the Molds
Choose two containers — one larger to form the outer wall, and one smaller to create the cavity for soil. Spray both with cooking spray or apply petroleum jelly. This prevents sticking when you unmold the planter later.
Step 2: Mix the Cement
In your mixing bowl, combine 2 parts cement with 1 part sand. Slowly add water until you get a thick, smooth paste. The mixture should be pourable but not watery. Stir thoroughly to avoid lumps.
Step 3: Pour the Cement
Pour the cement into the larger container until halfway full. Press the smaller container inside, making sure it is centered. Place weights (like stones) inside the smaller container to prevent it from floating.
Step 4: Let It Set
Gently tap the sides of the mold to release air bubbles. Leave it undisturbed for at least 24–48 hours. For larger planters, allow up to 72 hours for curing.
Step 5: Remove the Mold
Once hardened, carefully remove both containers. If using plastic, you may need to cut the mold with scissors. Smooth rough edges with sandpaper.
Step 6: Finish and Decorate
You can leave the planter raw for a chic, industrial look or paint it with acrylics. Adding a sealant will protect the cement from moisture damage.
Creative Ideas to Personalize Your Cement Planters
- Add Color Pigments
Mix in natural pigments or food coloring with cement to get vibrant shades. - Create Patterns with Tape
Use masking tape before painting to design stripes or geometric patterns. - Try Unusual Shapes
- Use balloons for rounded pots
- Juice cartons for rectangular planters
- Plastic bottles for cylindrical designs
- Make Mini Succulent Pots
Egg cartons or disposable cups make perfect molds for tiny, adorable planters. - Add Drainage Holes
Place a straw or stick at the bottom before the cement hardens to create a hole for water drainage.
Real-World Examples: Where to Use DIY Cement Planters
- Apartment Balcony Garden: Line them along railings with colorful flowers.
- Living Room Decor: Place a medium-sized cement planter with a leafy plant like Monstera in a corner for a bold look.
- Work Desk Accents: Use small planters for succulents or cacti to bring life to your study table.
- Bathroom Greens: Waterproof sealed planters can hold moisture-loving plants like ferns.
- Outdoor Porch or Garden: Large cement pots are sturdy enough for big plants and shrubs.
Extra Tips for Beginners
- Wear gloves to avoid skin irritation from cement.
- Always mix in a well-ventilated space.
- Don’t rush the drying process — stronger planters come from slower curing.
- Apply a waterproof sealer if planters will be outdoors.
- If you love a rustic look, leave the edges rough instead of sanding.
Cement Planters vs. Other Planters
| Feature | Cement Planter | Ceramic Planter | Plastic Planter |
|---|---|---|---|
| Durability | High | Medium | Low |
| Weatherproof | Yes | Fragile in cold | Can crack in sun |
| Cost | Low | Medium-High | Low |
| Customization | Unlimited | Limited | Very limited |
| Style | Modern/Rustic | Decorative | Basic |
👉 This comparison highlights why cement planters are the best DIY option for apartment gardens and modern interiors.
